Rib Cage Placement: Find Muscles You Didn’t Know You Had!

If you missed those articles or have forgotten what they said, please go back and refresh your memory. The Five Basic Principles serve as a foundation upon which all of our Pilates moves will be based. (It’s worth noting that, for those of you who are reading the Pilates and yoga posts, yoga has its own guidelines for alignment which are most often addressed on an individual basis.) In a Pilates warm up, you should find neutral positioning and move from there.
Why is rib cage placement important?

This sounds pretty horrible, but it’s really common. It’s also a frequent cause of low back pain. So, what can you do to align your ribs and pelvis to make a more stable cylinder?
Let’s consider that all four of your abdominals run between your ribs and your pelvis. In order of deepest to most superficial, your abdominals are the: transversus, internal obliques, external obliques, and rectus abdominis. That means that when the abdominals are engaged and doing their job, they will naturally hold your rib cage and pelvis in neutral. If they do not hold you in neutral, they are experiencing some dysfunction and can be trained to be corrected. One way you would correct a splaying rib cage (rib cage that opens forward) is with Arm reaches.
How to do Arm Reaches
- Begin on your back with your knees bent, your heels in line with your SITs bones.
- As alignment is crucial, let’s take a moment to check where we are. We have already covered how to check for a neutral pelvis. To check if your rib cage is flared open, place your hands along your bottom ribs. Your thumb and pinkie finger should be in the same plane if your hands are flat. If you find that your rib cage is opened to the front, gently engage the abdominal muscles to bring the ribs down. This should not be particularly taxing (take it easy, Type A folks!), but it might feel like a challenge because you are becoming aware of your abdominals in this area for the first time.
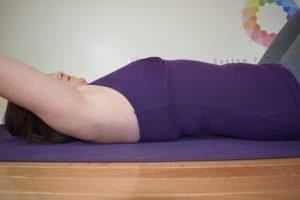
- Reach your arms straight up to the ceiling with your palms facing each other, shoulder blades touching the floor. Lengthen the back of the neck to make sure the chin is not lifted up higher than the forehead.
Both arms hinge at the shoulders to reach toward your head and then come back to starting position. How far your arms go depends upon your ability to engage your abdominals to hold your rib cage in place. Do not let your arms go too far and pop open your ribs! Play around with where you inhale and where you exhale. It will feel different when you switch your breathing.
- Always be mindful of what you are doing! Think about what muscles are supposed to be working, and always keep tabs on where your rib cage is placed.
How to do Arm Scissors and Arm Circles
- Arm scissors: Begin in our step 3 starting position. One arm hinges up toward your head, while the other arm lowers by your side. Both arms return to center. Switch sides. At no point in time should your arms rest on the floor.
- Arm circles: Begin in our step 3 starting position. Hinge both arms as if you are doing Arm reaches. As you get to your deepest point, rotate from your shoulders to open your palms to the ceiling. (Did you guys see that I put that in bold? Yeah, it’s that important.) Bring your arms with the palms facing the ceiling by your sides. Rotate your palms to face your thighs and bring your arms back to starting position. At no point in time should your arms be sliding on the ground. Once you have done a few this direction, switch directions.
- Always be mindful of what you are doing! Think about what muscles are supposed to be working, and always keep tabs on where your rib cage is placed.
Below is a video to show you more.
How about those muscles along the bottom of your rib cage? Did you even know they were there before today? Let me know in the comments below!
Thank you for reading this article. If you enjoy the information supplied, please consider supporting this website!
Sign up for my newsletter to get more tips for health and happiness! Also, you can find me on Facebook, YouTube and Pinterest as Custom Pilates and Yoga.
 Both arms hinge at the shoulders to reach toward your head and then come back to starting position. How far your arms go depends upon your ability to engage your abdominals to hold your rib cage in place. Do not let your arms go too far and pop open your ribs! Play around with where you inhale and where you exhale. It will feel different when you switch your breathing.