How to Strengthen Your Hip Adductor Muscles to Relieve Hip and Low Back Pain

If you have hip or lower back pain, you need to strengthen your hip adductor muscles. These inner thigh muscles do more work than you realize.
If you’re searching for answers about why you’re having hip or low back pain, your hip adductor muscles are some of the first muscles you should investigate.
This group of muscles along your inner thigh helps bring balance to your hip and knee joints, but they also are an essential component of your core muscles. Having strong core muscles helps ensure you’ll lead a happy life without back pain.
Which Muscles Are Your Hip Adductor Muscles?
Your inner thigh is a pretty large space. It’s about one-fourth of your upper leg, so you might imagine there are a bunch of muscles in there.
In fact, there are five muscles that count as part of the hip adductor muscle group. Three of them even have “adductor” as part of their name. From smallest to largest, your “adductor” muscles are adductor brevis, adductor longus, and adductor magnus.
Your two other adducting muscles are the pectineus and gracilis.
Where Are the Adductor Muscles?
Your adductor muscles are your inner thigh muscles. They’re responsible for moving your upper leg toward the midline of your body.
Below you’ll learn where each muscle begins and ends. This can help you figure out how to troubleshoot any muscle weakness or pain.
The Three Adductors’ Origin and Insertion
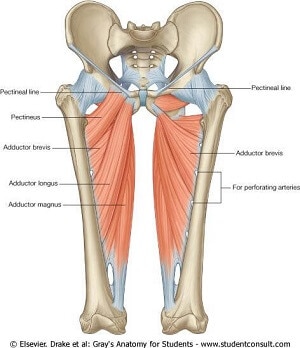
Adductor brevis, adductor longus, and adductor magnus originate on a part of the anterior part of the pubic bone, called the samus.
See how the green muscle connects to that center part of the pubic bone? That’s the start of the adductor longus in the picture, but that’s also where the other two adductor muscles begin.

The adductor magnus also starts on the ischial tuberosity. The ischial tuberosity is the IT part of the SITs bones, which are the bones you feel pressing into the floor whenever you sit criss-cross-applesauce.
So, the three adductor muscles originate along the bottom edge of the front of your pelvis. Because this is all so near the pubis, you might think of the origin as in your crotch or groin area.
The adductors insert medially the whole length of the femur, from hip to knee. This means these muscles insert right down the middle of your thigh bone.
Remember: It’s not always important to know all the technical information about where a muscle starts and ends. However, if you’re having pain or joint instability, it’s worth a few rereads to try to figure the exact location of the muscle out the best you can.
Pectineus Origin and Insertion
The pectineus originates on the upper anterior area of the pubic bone, known as the superior ramus. This means it is a little bit further up the edge of the pelvis, a little bit farther away from the pubis.
See how that green muscle is further away from the center of the pubic bone than the addcutor muscles in the picture above? This means pain from this muscle would be further away from the center of your crotch.

It inserts on the upper medial shaft of the femur. This means it inserts high on your thigh bone—like so high that it would be covered by or at the bottom edge of short shorts.
Related: If you’re on a mission to relieve your hip or low back pain from your home, I can help! I’ve created an online course called Spinal Rejuvenation where you’ll learn the very best exercises and methods to relieve your pain and keep yourself pain-free.
Gracilis Origin and Insertion
The origin of the gracilis is the lower margin of the pubic bone.
Take a look at the picture for this muscle. Can you see how the start of the muscle is just a little green sliver that’s even more toward the center of the body than the three adductor muscles?

This means that if you feel a pain that seems to start right in the center of your crotch, this muscle might be your culprit.
The gracilis inserts on the upper part of the medial surface of the shaft of the tibia. This means that the gracilis crosses both the hip and knee joints.
Got hip and knee pain? The gracilis might be your culprit.
So, What Do the Hip Adductor Muscles Do?
All the muscles you can feel on your inner thigh—from your hip to your knee—work to adduct your femur (thigh bone). This means these muscles bring your thighs closer toward the midline of your body.
But that’s not all the hip adductor muscles do.
One of the main reasons the adductor muscles are important to us is because they help stabilize and balance the other muscles in the leg. This stability benefits the health of the knees and the hips.
And, although all of these muscles primarily work to bring your leg toward the midline of the body, many also have secondary functions.
For example, the three adductors also medially rotate the leg. This means they help your leg rotate inward. The pectineus, however, rotates the leg outward, causing lateral rotation.
The adductors longus and brevis and pectineus also flex the extended femur. This means they help lift your thigh bone in front of you.
Since the gracilis crosses the knee joint, it’s not a surprise that the gracilis also bends your knee and rotates your knee joint toward the midline of your body when your knee is bent.
In addition to all of this, your adductor group is part of your core muscles.
What Are Core Muscles?
Your core muscles are several muscles and muscle groups that work together to help keep your spine in neutral and allow your body to safely move.
Your core muscles are your:
- adductors,
- abdominals,
- psoas group,
- spinal muscles (like the erector spinae), and
- gluteus maximus.
But, What Happens When the Adductors Don’t Work?
When the muscles are not in proper balance, injuries may occur. This means if the hip adductor muscles are tight, weak, fatigued, or shortened; you could get hurt.
Some of the most common injuries are:
- pulled groin muscle,
- pelvic instability/popping or clicking near the pubic bone,
- hip pain,
- knee pain, and/or
- low back pain.
Keeping Your Hip Adductor Muscles Strong
Okay, before you hop into these exercises, there are a couple of things you need to know.
- If you are currently hurting or injured, give it time to heal before starting any sort of exercise.
- If you think you have torn any of your adductor muscles, please contact your doctor immediately. Your doctor can order all of the appropriate imaging, medication, or therapy necessary for your recovery.
- Tightness is the same thing as weakness. So, when you start trying to make this muscle group healthy again, you need to use a combination of exercises to strengthen and stretch the muscles.
Want to Know a Trick?
For many people (it’s like 75-80% of our global population), the adductors and the abdominal muscles are directly tied together.
If you feel like your abdominal muscles are starting to quit while you’re doing an exercise, re-engage your inner thighs, and lots of times your abdominals will hop back in, too.
That being said, let’s check out some awesome adductor-strengthening exercises.
My Top Five Exercises for Hip Adductor Muscles
Each of these exercises is a wonderful choice for making the hip adductor muscles healthier. However, pay attention to what you’re doing.
Remember: You need to stretch and strengthen.
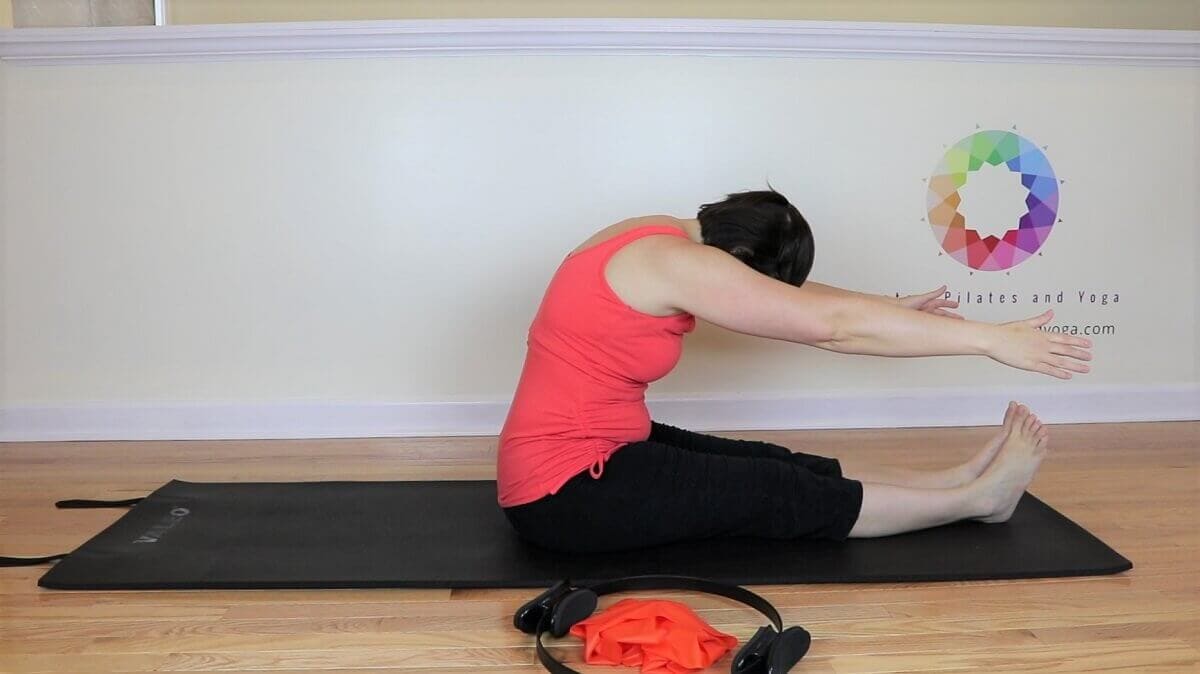
1. The Pilates Roll Up
This exercise can be intense, but there are tons of ways to modify it so anyone at any level can practice this strengthening exercise. Here’s the basic instructions:
- Inhale through your nose and exhale through pursed lips to use Pilates breathing.
- Sit with your legs straight in front of you. Squeeze your inner thighs together, and flex your feet. Feel the backs of your heels press into the mat. Inhale here.
- Exhale and tilt the pelvis, rolling down one vertebra at a time until you are lying on your back with your arms reaching toward the ceiling. As you roll down, make sure that your abdominals draw in toward your spine instead of pooching out in effort. If they pooch, pick a different version of this exercise for your next Roll up.
- Inhale and reach your arms above your head. Make sure that you don’t release your abs or let yourself relax on the floor. Bring your arms back above your chest.
- Exhale and let your head begin peeling your spine up off the mat one vertebra at a time. As you come up, your spine will stay flexed so that you end in a C-curve with your ribs lifted away from your hips and your arms reaching parallel to your legs.
- Inhale here.
- Exhale. Tilt the pelvis and roll down repeating steps 2-5.
- To finish, after you roll up to C-curve, inhale and lengthen the spine one vertebra at a time, starting with the pelvis.
- I recommend doing no more than 5 Roll ups because of the stress that they put on the hip flexors. If you’d like to add more, use them as a segway to move from exercise to exercise.
Related: How to Choose the Pilates Roll Up Modifications Best for You
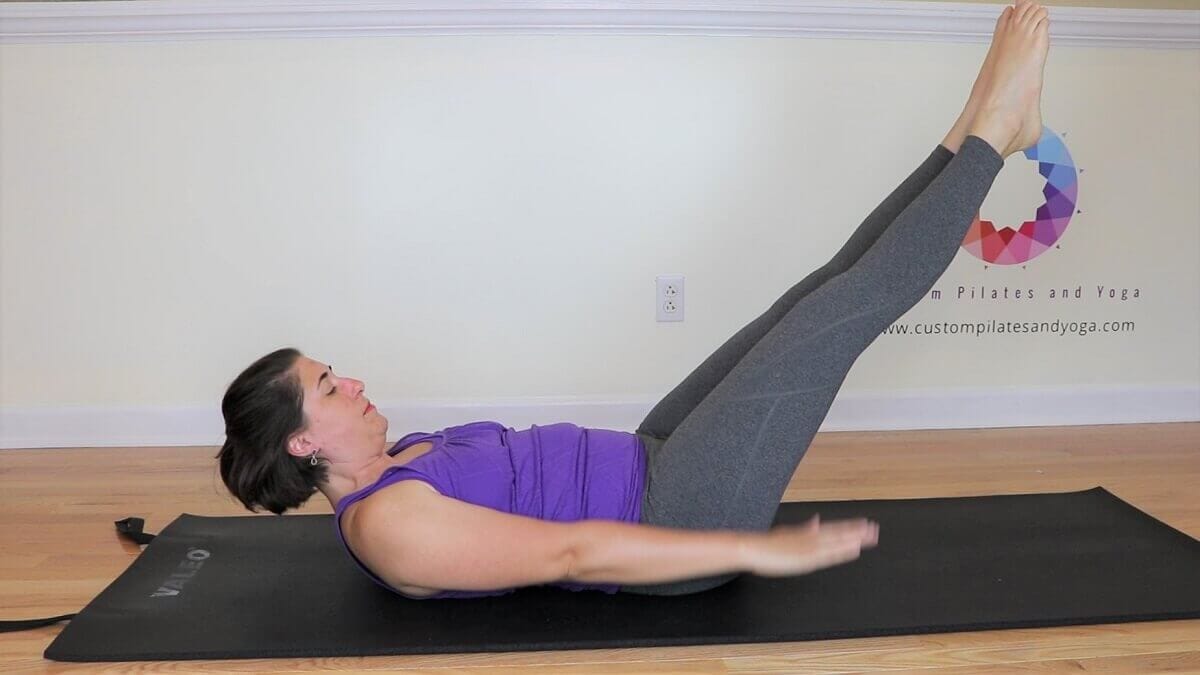
2. The Pilates Hundred
This is another wonderful exercise to help you strengthen your adductor group. And, although it’s also very challenging, there are tons of ways to modify this exercise so it will work no matter what fitness (or pain) level you’re at.
- Begin on your back with your knees bent, feet about a fist’s distance apart. Make sure your pelvis and spine are in neutral. Arms reach by your sides.
- Let your abdominals completely relax toward your spine.
- Inhale through your nose into the sides of your ribs, and lightly activate your abdominals to keep this hollowed-out abdominal position. Make sure your spine (including your head and pelvis) have stayed in neutral.
- Exhale, lift one leg up to Table top, followed by the other leg.
- Hug your inner thighs toward each other.
- Inhale into the sides of the ribs and, as you exhale, hinge at the bottom rib to lift your upper body as if you are doing an Ab prep.
- If you have a neck injury, leave your head and upper body on the floor. If you are unable to keep your pelvis in neutral with your legs lifted to Table top, place your feet back on the floor.
- Reach your legs out on a forty-five-degree angle without changing the shape of your spine and position of your pelvis. If your spine or pelvis have moved, bring your legs up toward the ceiling, bend your knees or even set your feet back on the floor.
- As you inhale and exhale, move at the shoulders to pump your arms by your sides. Your arms shouldn’t rise above your rib cage or lower the floor.
- Inhale through your nose for five counts. Exhale through pursed lips for five counts. Five plus five is ten. We do ten sets to make our Hundred.
3. Pilates One Leg Circles
This exercise is a little different from the others because it offers a strengthening and stretching opportunity. I do love a good multi-tasking exercise!

- Begin on your back with your spine in neutral and your knees bent. Your heels are in line with your SITs bones. (This means your feet should be about a fist’s distance apart.)
- Take a moment to ensure that your pelvis, rib cage, and head are in neutral alignment.
- Reach your arms by your sides and broaden your collarbones.
- Inhale through your nose as you lift your right leg toward the ceiling.
- Exhale through pursed lips as you fully extend your right leg. Try to keep your pelvis in neutral. (It’s okay if your leg doesn’t straighten all the way.)
- You may either keep your left leg bent or you may straighten it. Either way, make sure you still feel like the muscles in that leg are working.
- Inhale and bring your right leg past the midline of your body.
- As you exhale, your right leg circles down away from you, out to the side, and then toward your face. Please note that you’re drawing a circle on the ceiling. When the leg comes back to starting position, you’re not trying to return it straight to the ceiling. You’re using your thigh muscles (quadriceps) to bring the leg toward you. Circle this direction for 5-10 reps.
- Switch directions. Inhale and reach the working leg out to the side. Exhale and circle the leg down, past the midline, and toward your face. Circle this direction for 5-10 reps.
- Inhale to bend the knee. Exhale to set the foot on the floor in line with the SITs bones.
- Do the other side.
Related: Get Trim Thighs with One Leg Circle!
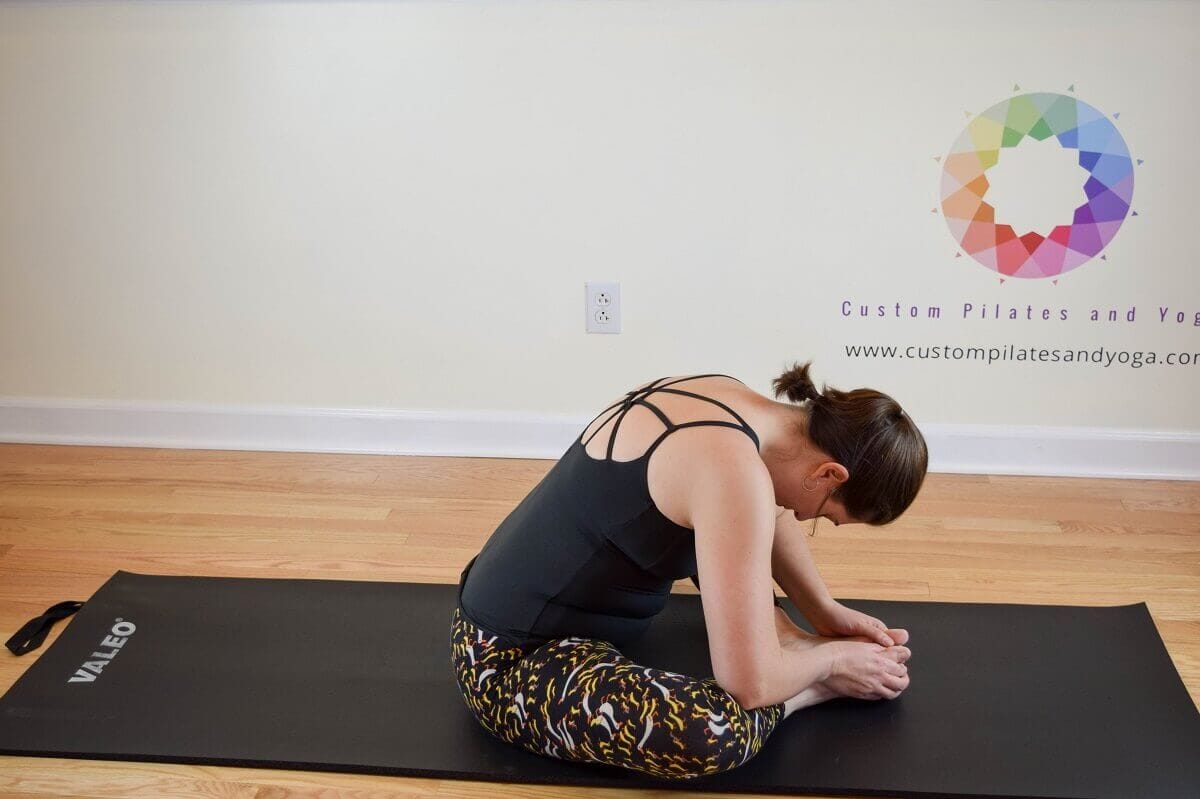
4. Butterfly Pose
This yoga classic is a wonderful way to stretch your inner thighs. Even if you’ve never done a day of yoga in your life, you might remember this stretch from gym class.
- Take a seat on the floor, and bring the soles of your feet together. Make sure you still feel your SITs bones pressing into the mat. Also, ensure that your right and left foot are pressing evenly into each other.
- Bring your heels toward your crotch. As your feet move, make sure to keep contact between the right and left foot.
- If your knees are higher than your hips, you can sit on a bolster or slide your feet further away from your crotch. Do what you can to bring your hips higher than your knees.
- Loop your pointer finger and thumb around each foot’s big toe.
- Lengthen through the spine, lift the ribs away from the hips, and draw the belly button to the spine.
- Hinge from the hips to lower the upper body forward. For the moment, keep a straight spine. Be aware that, in order for your spine to move forward, your pelvis must rotate. As the pelvis moves, so will your SITs bones.
- Relax your head and spine forward.
- Take 5-8 long breaths.
- Engage the abdominals and lift up. You can repeat this or just practice it once.
Make sure that you rotate your legs from your hip sockets in order to help your knees lower. If you try to slam your knees to the floor with the force of your arms, you will get a groin injury.
Related: Baddha Konasana (Butterfly): A Misunderstood Hip Opener
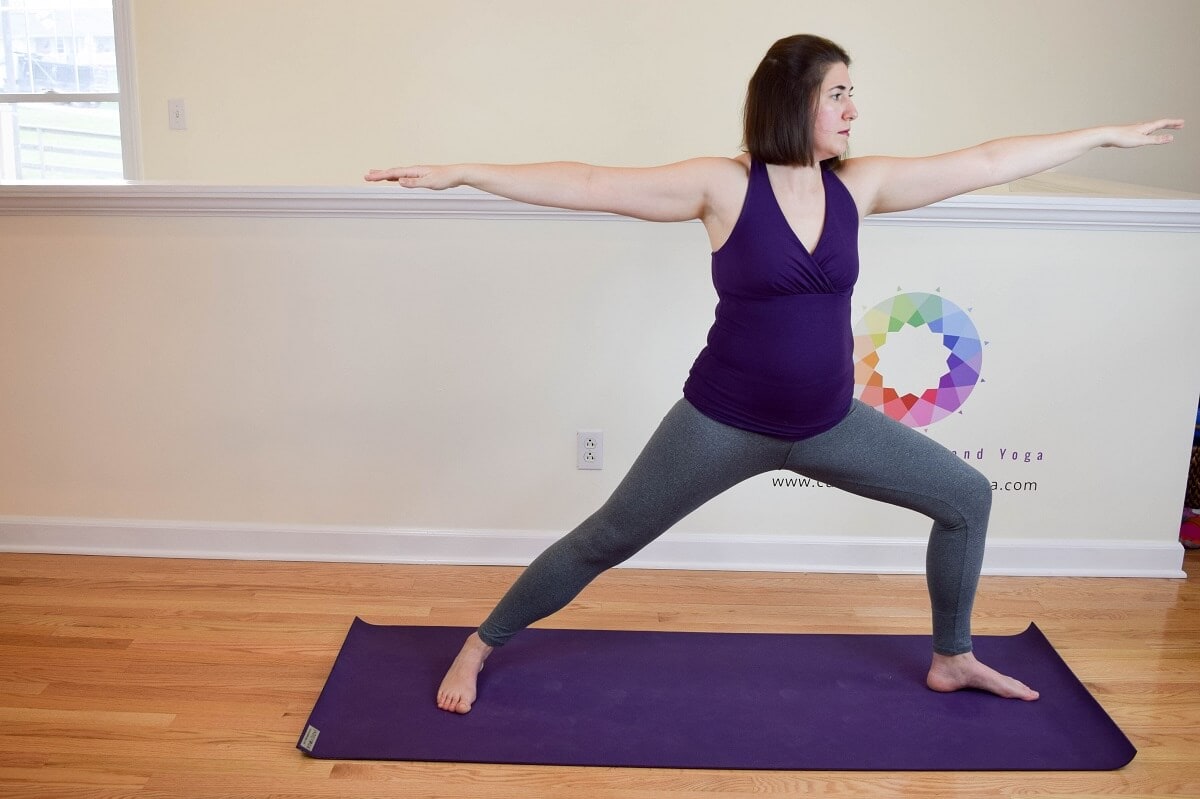
5. Warrior 2
This yoga pose is one of my favorites because of its multi-tasking. Feel your inner thighs work on your bent leg while the inner thighs of the straight leg stretch.
- Stand at the front of your mat.
- Send the right leg back so you’re in a lunge with parallel legs.
- Spin the right foot down at a ninety-degree angle so you are lined up left heel to right heel or arch.
- Stick your left hip out behind you, then tuck it under. This will help get your thigh bone (femur) set correctly in your hip, preventing knee injury.
- Draw your low belly to your spine and place your hands on your hips. Use your hands to make sure your hips are facing the same direction as your right toes. Make sure your ribs are aligned over your hips.
- Reach both arms straight out by your sides. You should be able to see your fingertips in your peripheral vision. Your fingertips should feel like they are actively reaching to opposite walls. This should help broaden your collarbones and keep your shoulders away from your ears.
- Turn your head to look out over your left fingers.
- Take a peek down to make sure that your left knee is tracking out over your second and third toes. In this pose, the front knee can bend to ninety degrees or more, depending on your strength and flexibility.
- Make sure that your right leg is straight with the outside edge of the right foot sealed to the mat.
- Hold for 5-8 breaths.
- As you hold, think about inhaling to lengthen and exhaling to soften and move deeper into the pose.
- Make sure that your rib cage stays stacked above your pelvis and avoid the temptation to let your upper body lean forward.
- After your breaths, straighten the left knee and spin the left toes to face the same direction as the right toes.
- Switch your legs to do the other side.
Related: Warrior 2: Watch Your Knees
Some Honorable Mentions:
These exercises are also really great for that stretch/strengthen combo. Plus, you often move from Warrior 2 into one or more of these poses to create a killer adductor-strengthening combo.
You might also want to check out:
When you practice these yoga poses, it’s important to feel like you are pushing the floor away with your legs. By doing this, you will also feel a scissoring movement, like your inner thighs are trying to move toward and past each other. This scissoring feeling indicates that your inner thighs are working and strengthening.
Frequently Asked Questions About Hip Adductor Muscles
Even though you’ve undoubtedly learned so much about hip adductor muscles, you might still have some questions. Below are the top questions people ask about hip adductor muscles and my answers.
1. What are the symptoms of a weak hip adductor?
You might start to think you have weak hip adductors if you start noticing you have knee, hip, or low back pain. It might also feel like overall weakness of the muscles in your thigh area. Or, you might feel like you have trouble or pain when you walk or run.
If this sounds like what you’ve got going on, you’re probably safe to start doing exercises to strengthen your weak hip adductor muscles. However, if your pain persists or gets worse, you should stop exercising and see your doctor.
On the other hand, if you’ve done something particularly damaging to your adductors, you might notice swelling or bruising in the upper leg or groin area. In this case, you’ll want to check in with your doctor before beginning any exercise to strengthen your weak hip adductor muscles.
2. Why do hip adductors hurt?
Your hip adductors might hurt because the muscles attach near a sensitive area–the groin. Any time you’ve got inflammation or tightness near your crotch, you’re going to be hyper-aware of it.
This pain doesn’t necessarily mean that you’ve done something horribly wrong to yourself. It could just mean that your adductors are tight or weak.
However, I do want to take a moment to share a personal story to illustrate why it’s best for you to pay attention to how you’re feeling and decide when it’s time to see a doctor. I had a personal training client who was very active and started noticing hip pain when she was jogging. She had done yoga previously but had quit a few months ago. I checked her adductor flexibility, and it was poor.
We started doing exercises to stretch and strengthen her adductors, but the pain persisted. After a couple of weeks of doing everything we could, she decided to see her doctor. It turned out the lining in her hip socket had worn away, and she needed a hip replacement.
We had no idea she was having a structural hip socket issue because the pain seemed like it was such a reflection of tight/weak adductors. It was such a blessing that she went to the doctor when she did so she could have the hip replacement after she’d already been stretching and strengthening her adductors!
So, if you’re having pain and you try hip adductor exercises but don’t feel better, don’t be afraid to call your doctor and go have a chat.
3. What are the hip abductor muscles?
You’ve been learning all about the hip adductor muscles, but you might want to know just a little bit about the hip abductor muscles–the muscles that help balance your adductors.
Your primary hip abductor muscles include your gluteus medius, gluteus minimus, and tensor fasciae latae. Your secondary hip abductor muscles include your piriformis, sartorius, and part of the gluteus maximus.
4. Does walking strengthen adductors?
There are lots of muscles involved when you use correct form to walk. You use your hamstrings, quadriceps, calf muscles, and adductors. However, if you’re not walking correctly, you’re missing out on strengthening some of these important muscles.
For example, if you’re walking with your feet hip-width or wider, you’re not working your adductor muscles at all. Instead, you’re probably overworking your hip abductor muscles and maybe also causing knee pain.
Although walking is an excellent exercise that’s appropriate for almost everybody, I sure wouldn’t recommend it as a solid way to strengthen your hip adductors.
5. Does sitting weaken adductors?
Honestly, sitting for too long weakens tons of muscles–including the adductors. For those who have to sit for extended periods of time, the key is to take breaks.
Stand up. Walk around for about 10 minutes. Stretch out if you feel tight.
Then, when you return to a seated position, pay attention to how you’re sitting. The very best form for a seated position is to have both feet a little bit more than a fist’s distance apart from each other and flat on the floor. This will help keep your adductors in a neutral alignment.
Want to Learn More?
If you’re researching adductors today because you have some hip or back pain that you’re trying to get rid of, you’re in luck! I’ve created a course to teach you everything you need to know to permanently ditch hip and back pain. Click here to check out my Spinal Rejuvenation program.
Kenhub.com is a leader in human anatomy-related information. To learn more about the adductor muscles, check out their post. It also includes videos!
You can also check out David Keil’s post, “The Adductors: What Are The Adductor Muscles?,” or his yoga anatomy book, Functional Anatomy of Yoga. (When you buy this book through this link, I earn a small commission.)
To learn more about the adductor group and other muscles in your body, check out The Concise Book of Muscles by Chris Jarmey. (Again, if you make a purchase through this link, I earn a small commission.)